In this article, we are going to explain to you everything you need to know about surgical sutures. Kc surgicals has been providing cost reduction and cost recovery solutions to hospitals and surgical centers across the country for over 15 years.
We summarized all there is to learn about sutures and answered all the questions you might have, so you don’t have to wander around the web. When your life hangs by a thread you will be glad to have had the opportunity to read this information and that you have prior knowledge of the subject.
Acclaimed Merriam Webster Dictionary defines suture (su·ture | \ˈsü-chər) as a strand or fiber used to sew parts of the living body, also: a stitch made with a suture. The verb to suture is defined as to unite, close, or secure with sutures.
We all learned in school that skin is the largest organ in our bodies. So imagine how many miles of suture is being used in a year around the world? It’s a number you can’t pronounce, but we can promise you that it’s over a billion words long.
Without further ado, let us show you some amazing facts about surgical sutures.
1. What are surgical sutures?
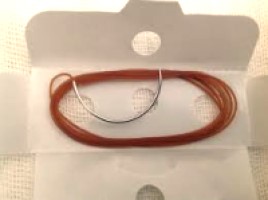
Surgical suture is a medical device made to protect body wounds and tissues after cuts (lacerations) or surgery. Sutures are sterile surgical threads that close wounds to your skin or other tissue. Sutures are also commonly used for blood vessels, internal organs and all other tissues of the human body, after they have been detached by injury or incision.
2. What are surgical sutures made of?
There are many kinds of sutures, with different properties suitable for various uses. Further, the thread itself must have strength to hold the tissue, but also it has to be flexible enough so you can make a knot. Throughout history, people used natural materials to stitch a wound, like plants (cotton or hemp), animal hair or even animal arteries and muscle stripes. Ouch!
But today, thankfully, there are a lot of materials on the market. The main classification splits the sutures on: absorbable and non-absorbable, which means that absorbable will dissolve by themselves in your skin after some period of time and there is no need to go to the doctor to remove them. For non-absorbable sutures you will, of course, have to see your doctor again to remove them afterwards or in some cases they are left in for good.

3. Who uses sutures?
Many members of the medical staff use sutures every day doing their noble job: surgeons, ophthalmologists, physicians, pediatricians, cardiologists, registered nurses and other trained nursing personnel, medics, clinical pharmacists. But also, let’s not forget to mention veterinarians, dentists and embalmers.
However, imagine this situation. You and your family or friends are on a camping trip or hunting adventure in a very remote place and someone gets hurt. Maybe you cut yourself with a can-opener or a knife, or maybe you caught a jagged branch with your hand. This is why suture kits are necessary for life threatening medical emergencies and the reason why many experienced mountain climbers or extreme sports enthusiasts have their suture kit in their survival kit all the time.
If you find yourself in a difficult situation, you may have to suture yourself before professional medical personnel come in to help, but you should know that do-it-yourself suturing should only be done in real emergencies!
Check our eBay store to buy the best quality suture training kits and products
4. How to make a perfect suture?
Suturing yourself should be avoided by all means and you should wait for a doctor, but if you are in a tricky position, this is what you need to know about suturing.
There are many various suturing techniques (which will be mentioned later on), but for the purpose of this article we shall explain how to perform the most forthright suturing technique: interrupted (or intermittent) sutures.
The name derives from the approach itself: the stitches are not connected to one another. You make one, cut off the thread, and then make another.
Interrupted sutures are simple to position and protect. They also allow you to make changes much more easily than a continuous suture.
Here is how to make an interrupted suture:
- Wash both of your hands, and we mean wash them good. Like a good doctor. There is a smaller chance of infecting the wound if your hands are clean.
- Prepare the wound. Clean everything around it, clean the injury from debris, dust or pebbles. Very important thing is to clean the wound from blood as much as possible.
- Put your sterile gloves on.
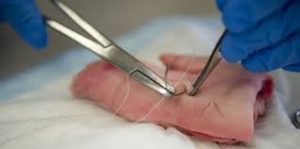
- Take the needle holder (needle driver) and grab the needle with it. The needle should be loaded between the apex of its curvature and two thirds from the needle tip.
- Take out all the thread from the package and straighten the suture.
- Collect the toothed forceps (pickups) and gently lift the skin on one side of the wound. Then you will see how deep the injury is.
- While holding the forceps, pierce the skin with the needle vertically to the skin. It should be 90 degrees angle. Don’t go deep into the skin, finish the prick just above the fat.
- The needle must pass through the skin and rise out in the middle of the open wound.
- Re-grasp the needle and lift it out of the wound. Pull the thread a little and then using the forceps gently lift the other side of the laceration.
- Use your wrist to move the needle through the skin until the needle comes out on the surface.
- Pull the suture through the skin so there is approximately 2 inches of length on the opposite side.
- Cut the suture with scissors, make a loop and lay the first knot.
Congratulations! You have just made your first stitch!
Check our eBay store to buy the best quality suture training kits and products
Repeat the process, stitch up the wound and now take the patient to the closest hospital please!
Make sure to check the video for more information about how to suture like a surgeon, made by charming Buck Parker, M.D.
5. What are the most famous suture techniques?
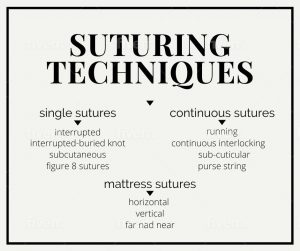
Since we have mentioned the interrupted technique of suturing, now is the right time to let you know what other techniques there are. The techniques can be divided in three main categories: single suture category, continuous suture category and mattress suture category. You will find a lot of different categorizations online and also in medical textbooks, including many that bear famous surgeon names by the person who invented them. We’ve researched the results and summarized them for you (some sources list over 25 different suturing techniques-there are a lot of stitches there).
Our previously mentioned interrupted suturing technique belongs (as we already know) to the single suture category, and it is the easiest procedure, used for superficial injuries or lacerations.
Continuous sutures can be placed quickly and are also solid, since tension is dispersed steadily throughout the continuous suture string. As their name explains, they demonstrate the technique of suturing by having all the sutures connected to one another, creating a unique, endless strand.

Mattress sutures are also widely used by doctors because they guarantee less prominent scarring. Vertical and horizontal mattress sutures provide injured edges to be united under pressure when wound edges need to be brought together over a distance, but the edges are fragile. The name of this technique derives from the positioning of the sutures; once they are done, their structure resembles a little bed.
6. Suture sizes
There are surgical sutures available in various sizes, the classification is made based on the width of the suture (thread). Largest size is 1-0 and smallest size (extremely fine) is 11-0. Increasing the number of zeros correlates with decreasing suture diameter and strength. Thicker sutures are used for deeper layers of the skin, wounds in tension prone areas and ligation of blood vessels. Thin sutures are used for closing delicate tissues like skin incisions of the face, where you want your scars as little as possible.
7. Removing of sutures
Removal times of sutures depend on the part of the body that has been sutured. The suggested removal times of sutures are as follows:
- Face: 3 to 5 days
- Neck: 5 to 8 days
- Scalp: 7 to 9 days
- Upper extremity: 8 to 14 days
- Trunk: 10 to 14 days
- Extensor surface hands: 14 days
- Lower extremity: 14 to 28 days
* You should also consider that timing of removal can depend on a lot of factors: properties of the would at the time of securing (e.g. how deep was the injury, how large was the area affected); the age of the patient and his or her medical condition; parts of the body that has been sutured (e.g., knees or hand joints); therapy that the patient takes regularly, and if the patient has any vascular disease. These factors may extend removal time.
When the time comes for suture removal, your doctor will clean and sterilize the area, then he or she will gently pick one side of the suture and cut it off, and then do the same procedure on the other side of the suture strand. After cutting the threads, the nice doctor will smoothly pull out the suture from the injured area.
8. Goals of suturing
In today’s medicine suturing is widely used for many purposes. As Mr. Shilpa Shivanand, MDS nicely put together in his researched article, the main goals of suturing are:
- Providing an adequate tension
- Permitting primary intention of healing
- Providing support for tissue margins
- Reducing a post-operative pain
- Preventing bone exposure
Fun fact: Physicians have used sutures for at least 4000 years!

9. Suture kits
As we said before, if you are into extreme sports or if you are outdoorsy type in general, whenever you are up for adventure, you should have your suture kit by your side, just in case. In our products page you can find and order yourself everything-you-need suture kit (internal link to products page>suture kits). A useful kit must have at least:
- Several packs of sterile in-date sutures of the most common types with needles
- Alcohol prep pads
- Povidone Iodine Prep Pads Antiseptic
- 1x Needle holder
- 1 x Scissors
- 1x Forceps
Once you bought a suture kit it is necessary that you practice to suture successfully. It is remarkably important that you learn a process of suturing and how to appropriately use all tools and supplies you have got in your kit.
Trying to seal an open wound, when you have absolutely no idea what you are doing, can quickly become much worse than it was when the injury occurred.
10. Sutures vs. stitches
You will often find words “sutures” and “stitches” used as synonyms, which is not quite right. It’s crucial to indicate that suture is a medical device made to protect body injuries and stitching is the surgical procedure used by your doctor to seal the wound.
11. Sutures of the skull (bones)
Sutures of the skull (cranial sutures) are synarthrosis or a type of “joint” in which the bones are connected by fibrous tissue in the baby’s skull. The role of cranial sutures is twofold: first, they ensure the maintenance of the distance between the bones of the skull arch during infancy. Second, during childbirth, by folding the bones, the baby’s head can come to life without pressure or brain damage, allowing the newborn’s head to be flexible when passing through the birth canal. The sutures remain flexible for some time after birth, and the period of the most intensive growth of the skull takes place in the first six months of a newborn’s life, only to end between the 4th and 6th year of the child’s life.
Now we would like to hear from you.
We prepared all these 11 helpful things about surgical sutures you need to know in 2020.
Have we missed anything that you might want to read on this topic?
Are you willing to try to learn how to suture like a surgeon?
If you are, then go to our products page and start ordering. This could potentially save your life someday.
Either way, let us know by contacting us via our contact form.
Check our eBay store to buy the best quality suture training kits and products

